Guia de medidor de fio de áudio de carro com gráficos
Ao atualizar o sistema estéreo do seu carro, é importante obter o calibre de fio do tamanho certo e, embora haja muitos fatores em jogo, este guia de calibre de fio fornecerá conhecimento suficiente para entender qual tamanho obter.
Seja para seu amplificador, subwoofer, alto-falantes ou outros componentes, obter o tamanho certo de fio é fundamental para obter o melhor de seu novo equipamento.
Errar não afetará apenas o som da sua música, mas poderá danificar seu equipamento de áudio, a fiação elétrica do seu carro e, na pior das hipóteses, você pode até provocar um incêndio em seu carro.
Neste artigo, analisamos os principais tipos de fiação de áudio do carro e a bitola de fio de tamanho diferente que você precisa para cada um. Há um gráfico de bitola de fio para cada explicação, que deve lhe dar uma ideia próxima o suficiente da bitola que você precisa.
Medidor de fio americano (AWG)
A maior parte do mundo usa o American Wire Gauge (AWG), que é a medida padrão dos EUA para o diâmetro de condutores elétricos. É baseado no número de matrizes originalmente necessárias para extrair o cobre até o tamanho necessário. Assim, quanto menor o número, mais grossa a bitola do fio.
O AWG foi introduzido pela primeira vez em 1857 como um padrão para substituir as várias medidas usadas por diferentes fabricantes. O maior tamanho de bitola do fio é 0000 AWG, enquanto o menor tamanho padrão é 40 AWG.
Isso é usado para fios sólidos e fios trançados, embora os fios de cobre trançados possam ser um pouco mais volumosos do que os fios sólidos, mesmo que tenham a mesma bitola. Mesmo assim, usar o guia de bitola de fio AWG levará você ao mesmo resultado.
Há muito debate sobre se uma contagem maior de fios melhora seu desempenho de áudio, mas na verdade não se trata de mais fios de fio, mas de obter a bitola certa do fio.
Certifique-se de proteger as conexões de fios corretamente
O uso de um guia de calibre de fio é necessário para obter o tamanho certo, mas conectar os fios com segurança também é fundamental ao instalar qualquer equipamento de áudio, pois garantirá uma conexão boa e sólida.
Uma conexão ruim pode se soltar rapidamente e, se isso acontecer, pode causar muitos problemas para o seu sistema estéreo e uma dor de cabeça que você não precisa.
Existem muitos tipos diferentes de conectores, e alguns são melhores para certas fiações elétricas, mas qualquer que seja o conector que você usar, certifique-se de ter uma conexão sólida.
Os conectores de crimpagem são bons o suficiente. Basicamente, eles são um conector elétrico usado para terminar ou conectar fios trançados. O fio entrará no conector e, contanto que você o prenda com alguns crimpadores, obterá um aperto sólido e permanente.
A solda também é outra ótima maneira de proteger sua fiação elétrica. É um pouco mais trabalhoso, mas desde que seja feito corretamente, com o equipamento de solda correto, é a maneira mais segura de conectar seus fios e equipamentos de áudio.
Os fios de solda fornecerão a melhor conexão, mas certifique-se de fazer o trabalho corretamente. Se você nunca fez isso antes, recomendo obter alguns conectores de crimpagem, porque conexões mal soldadas podem levar a muitos problemas.
Depois de conectar seus fios, é sempre uma boa ideia encolher as conexões. Isso os protegerá de poeira e sujeira e fortalecerá sua conexão, garantindo que seus fios nunca se separem.
Então, agora que você tem todas as informações sobre o padrão AWG e obtendo a melhor conexão para sua fiação elétrica, é hora de consultar o guia de bitola de fio para cada instalação.
Conexões de aterramento
Conexões de aterramento são necessárias para todos os dispositivos elétricos instalados em um carro. Um aterramento é uma conexão elétrica negativa que alimenta a unidade e será conectada principalmente ao chassi do carro. Um aterramento ruim é provavelmente a causa mais comum de problemas de áudio no carro, portanto, certifique-se de fazer isso corretamente.
Os fios de aterramento devem ser montados de forma segura para limpar, metal sem pintura ou pontos de aterramento dedicados no chassi. Um ótimo lugar para conectar o aterramento é sob o parafuso do cinto de segurança, pois ele fornecerá uma conexão segura ao seu chassi.
Os fios de aterramento devem ter o calibre de fio do tamanho certo necessário para a aplicação. Portanto, se você estiver instalando um amplificador de 600 W, seu medidor de fio de aterramento precisa ser capaz de alimentá-lo.
Geralmente, seu fio de aterramento será do mesmo tamanho que o cabo de alimentação que discuto logo abaixo, portanto, para o guia de bitola de fio correto para seu aterramento, siga o tamanho do cabo de alimentação.
Conectando um amplificador no seu carro
Seu amplificador é um dos equipamentos de áudio, se não o que mais consome energia, e quanto maior o RMS que seu amplificador pode empurrar, maior será o cabo de alimentação que você precisará.
Se você usar um fio de alimentação muito pequeno, seu amplificador poderá ser danificado rapidamente, portanto, certifique-se de fazer isso corretamente.
Para calcular a bitola do fio necessária para o seu cabo de alimentação, você precisa ter uma ideia de quanta corrente seu amplificador tentará consumir e de quanto tempo a fiação vai da bateria ao amplificador.
Para calcular os amperes aproximados do seu amplificador, você precisa multiplicar o número de canais pelo RMS por canal. Se você tiver mais de um amplificador, precisará somá-los todos e dividir isso pela eficiência e depois pela tensão.
Existem dois tipos comuns de amplificadores:Classe D e Classe A/B. Você nunca obtém 100% de eficiência do seu amplificador, por isso lança outra chave inglesa nos trabalhos. Generally, Class D amps are more efficient and you should get around 75% efficiency, whereas with an A/B amp you will get around 50% efficiency.
So, to work it out:If you have a Class D amplifier, you need the total RMS divided by 0.75 Amp Efficiency divided by 13.8 Volts to get your Current Draw in Amperes.
So, if you have a 600W RMS Class D amp, your math will be 600/0.75/13.8 =57.9710145, which rounded up is 58 amperes.
As you can see in the wire gauge chart below, the gauge needed for an 8 foot power cable would be 8 gauge.
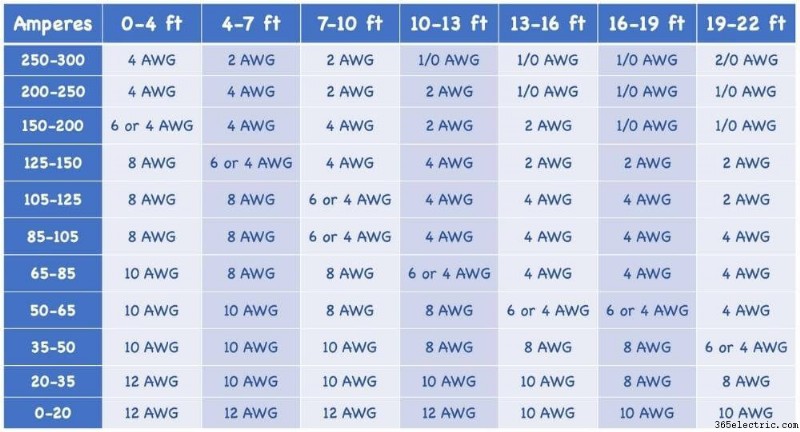
If you have an A/B Class, you need the total RMS divided by 0.50 Amp Efficiency divided by 13.8 Volts to get your Current Draw in Amperes.
So, if you have a 600W amp, your math will be:600/0.5/13.8 =86.956521, which I’d round up to 87 amperes.
As you can see in the wire gauge guide above, the AWG I’d need for a power cable of the same length would be either 6- or 4 gauge wire. I would always round down and go for the bigger wire so I’d get a 4 gauge power cable. Quite a difference from the D Class amp above!
Other Wires Running From Amplifier to Receiver
You can get amp wiring kits with all the wires and connectors in, which are a good idea as you can keep hold of them in case you need to replace any wires further down the line.
All amplifiers will come with a Remote Turn-on Wire, but if you have to replace it, you should get an 18 AWG blue wire.
For the RCA Jacks, you will just need to replace them with some standard RCA male-to-male jacks. These usually come between 22 gauge to 18 gauge, and the more powerful your amplifier is, the better it is to go with the bigger 18 gauge
Speaker Wires
Running speaker wires, whether it’s directly from your head unit or from your amplifier, allows your speakers to receive the audio signal, so they can reproduce those amazing sounds we all love to drive along to.
Speaker wires are typically 2 separate stranded wires molded together, with one strand being the positive + and the other strand being the negative – strand.
There are many different qualities of speaker wire, so it’s a necessity that you get the best you can afford, because cheaping out on speaker wires, will cause you problems and you won’t get the best out of your audio equipment.
Some cheaper wires that claim to be a certain gauge might not be, and instead you’ll be buying more plastic sleeve than wire.
Depending on the speakers you have will determine the wire gauge you need, and below in the wire gauge chart you can work out what is best for you.
Factory speakers will run on pretty much any size wire, as the power demands are minimal. But of course, most people into audio upgrade their car speakers, so getting the right size wire is necessary for you speakers and subwoofers.
Aftermarket speakers need more power, so the electrical wiring that drives the signal to them needs to be bigger than factory speakers.
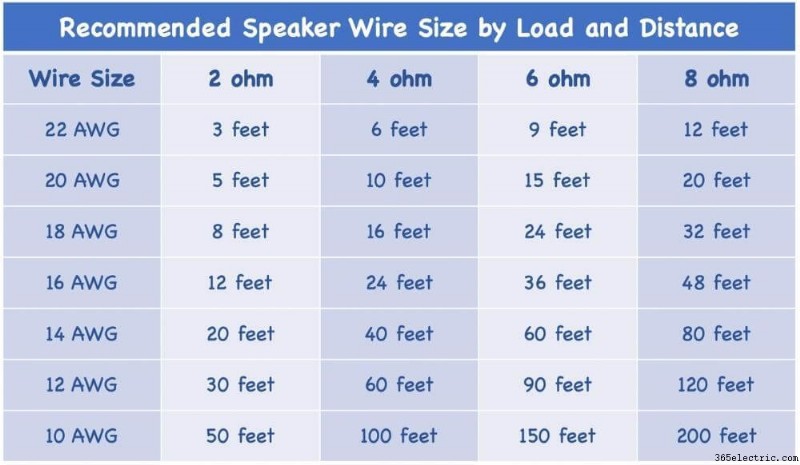
Speaker wires are usually between 18-14 gauge, but to work out the size for yours, you should know the Impedance and distance.
Looking at the chart above:If you are running speakers at 4 ohms and the distance needed is 20 feet, then you are between 18 and 16 AWG. In this case I would always go for the bigger wire, so go for 16 gauge.
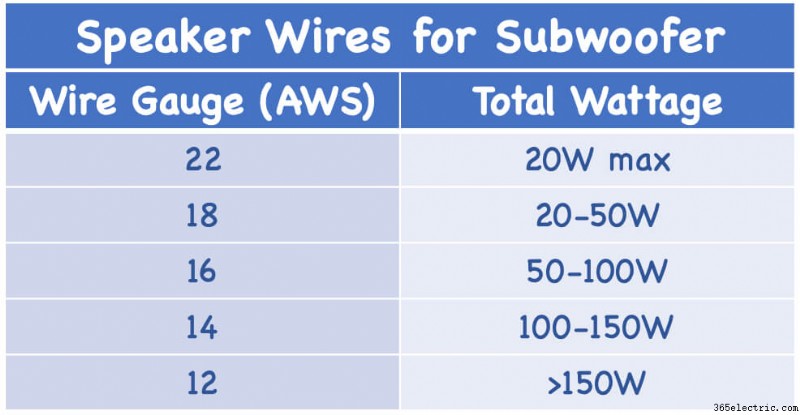
For subwoofers the speaker wire will tend to be a bit bigger. Usually you will need as big as 14-12 AWG, but the calculations are the same as the speaker wires on the wire gauge chart above.
Although another general rule of thumb is to work out its total wattage, and looking at the wire gauge chart here with RMS wattage, you can just go for that size wire.
You can use both wire gauge guides to come up with the wire size you need, but generally speaking you should need something between 16- and 12 gauge speaker wire for your subwoofer. And always go for the bigger wire if you’re getting mixed results.
Crossover Wiring
Using a crossover gives you more control over your sound system, but many people get confused with the electrical wiring.
Crossovers need 12v of power, which many people think it needs a thicker gauge wire, but because crossover demands less current, as a general guide 18 gauge wire is usually fine.
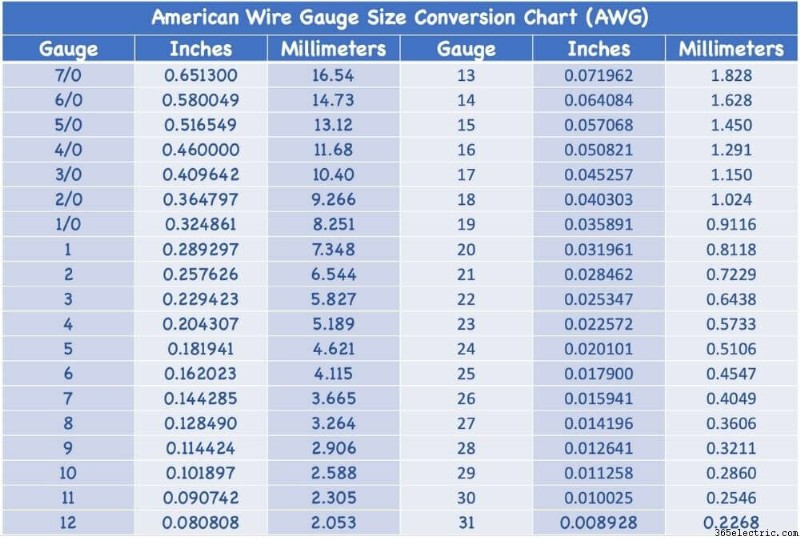
Wire Conversion Chart
All measurements in the wire gauge charts above are imperial, but for anyone who works in metric (most of the world), please find the wire gauge chart below for converting inches to millimeters useful.
Other FAQs About Electrical Wiring Gauge
Why do you need different gauge for different wire lengths?
Basically, resistance increases the longer electrical current has to travel. This is because as it’s travelling the electrical resistance builds up, so the longer it is, the more resistance. And the electrical current can only travel so far before there’s a voltage drop, which is why you need a bigger power cable.
What happens if I go too small?
If you get too small a size wire, it depends, but it’s not good. You might be lucky and just temporarily lessen the quality of of your soundstage, or you could damage your equipment and even set your car on fire.
The problem is determined by the wrong wires you install. That’s why it’s always necessary to know the correct size you need by looking at wire gauge guides.
What happens if If I go too big?
If you go too big, don’t worry too much as it won’t damage anything. But of course if you go too big it will cost you unnecessary outlay as the bigger wires are more expensive.
Also, the bigger the wire, the more room it will take up and the harder it is to bend. So, try and get it right, but too big is definitely better than too small.
What happens if my wires are too long?
When you buy the wires, it’s always a good idea to buy more than enough. However, when you install your audio equipment, don’t leave too much wire hanging out or even rolled behind something, even if it’s hidden.
Cut the wire at the appropriate length, because longer wires add unnecessary resistance and can create impedance. It also leaves your car looking messy.
Choosing The Right Size Wire for The Right Audio Equipment
So there you have it, a wire gauge guide for all the important electrical wiring in your car stereo system.
All the different wire sizes can be confusing, but looking at the charts or even a wire gauge calculator will give you a better understanding of which size to get.
All wiring is important, but pay particular attention to your power leads and do the math correctly for the total amperage and distance, because this is where you could get most problems.
Always ensure you buy good quality wiring, because you don’t want more sleeve than wire. There are some great amp wiring kits out there with all wires needed, so if you need the full bundle one of these is a good way to go.
Last but not least, always make sure you connect all wires with a good solid connection. Whether it’s crimp connectors or soldered connections, it’s up to you, but whichever way, make sure you test the connection with a few good tugs as you wire everything up.
If you have any questions and need more wire gauge guidance, leave a message in the chatbox below and we will get back to you.
