Instalar uma unidade principal ou substituir uma pode variar em dificuldade. Pessoalmente, gastei apenas 30 minutos substituindo uma unidade principal, até 4 ou 5 horas para o mesmo trabalho em um carro diferente. Há uma série de variáveis que podem ditar o quão difícil e demorada a tarefa realmente é:
- Componentes de painel e acabamento – Em nossa experiência, os carros mais difíceis são tipicamente alemães. Audi, BMW, Mercedes, Volkswagen. Os componentes do painel e do acabamento são muito resistentes, apertados e difíceis de remover.
- Fiação – A fiação pode variar de carro para carro. Isso realmente depende do número de recursos que o carro possui. Por exemplo OnStar em carros GM, ou apenas um estéreo amplificado OEM. Estas são as coisas que você precisa saber antes de fazer a fiação do seu carro e encomendar os chicotes de adaptação (vamos entrar em mais detalhes sobre isso em breve).
- Montagem da nova unidade principal – Isso pode ser especialmente difícil se você optar por fazer o DIY. No entanto, na maioria dos casos, você descobrirá que existem 'Kits Dash' adaptados de fornecedores como Metra e Scosche que simplificarão a montagem e a instalação do estéreo.
No final do dia, há carros que eu recomendaria atualizar ou substituir um aparelho de som e carros que eu não recomendaria. Neste guia, não apenas orientaremos você no processo de decidir se você deve atualizar a unidade principal do seu carro, mas também o orientaremos no processo, se você decidir fazê-lo!
Devo atualizar a unidade principal estéreo do meu carro?
Antes de comprar e instalar um dos nossos melhores estéreos automotivos ou unidades de navegação GPS recomendados, você precisa se fazer as seguintes perguntas para determinar se você deve atualizar ou substituir seu estéreo e com que tipo de estéreo você deve atualizá-lo.
- Primeira pergunta – Seu carro já tem uma unidade principal de reposição? Se este for o caso, sua instalação é bastante simplificada porque a fiação e a montagem já estão feitas. Tudo o que você precisa fazer é substituí-lo. Observe que você pode ter que trocar o chicote de fiação que se conecta à parte traseira da unidade. Neste caso, basta cortar e combinar os fios de cor para cor.
- A atualização da minha unidade principal fará com que meu veículo perca algum recurso/funcionalidade? Muitos dos novos veículos têm sistemas interdependentes que dependem do estéreo. Por exemplo, meu Ram 1500 tem configurações para saber se a buzina soa quando eu o tranco, se as travas travam automaticamente após um certo período de tempo, se as luzes permanecem acesas depois que eu tranco o caminhão. Tudo isso é controlado através da minha unidade principal de fábrica. Muitos veículos têm isso. Se o seu carro tiver recursos como esse que dependem da unidade principal, recomendo manter o estéreo padrão. Se você está procurando mais som, pode fazê-lo sem atualizar seu aparelho de som.
- Meu veículo tem várias telas? Em alguns casos, os carros têm várias telas interligadas. Por exemplo, em muitos Hondas há uma unidade principal, depois há uma tela de exibição que exibe informações da unidade principal, como a estação de rádio ou o CD. Substituir o estéreo pode tornar a tela inútil. Há casos em que foram feitos adaptadores, você deve pesquisar se eles foram feitos antes de decidir substituir sua unidade principal. Ou, se você não se importa, vá em frente!
- Por que estou atualizando o som do meu carro? Se você deseja um subwoofer ou alto-falantes mais altos, uma unidade principal não é sua única opção. Se você deseja recursos que não possui atualmente, como Bluetooth ou entrada AUX, também há adaptadores para isso. Descobrir se um aparelho de som substituto é a melhor opção para suas necessidades é fundamental.
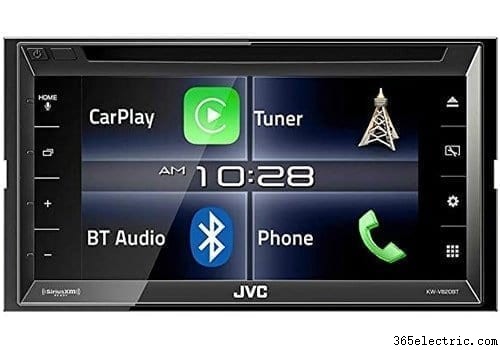
- Qual é o tamanho da minha abertura estéreo? Existem dois tamanhos principais nas unidades principais:1DIN e 2DIN. 1DIN é o menor dos dois. Pode caber em aberturas 1DIN e 2DIN. 2DIN é maior e normalmente é dedicado a unidades com tela sensível ao toque e telas maiores. Aqui está um exemplo da aparência de um 1DIN (esquerda) e 2DIN (direita):
-
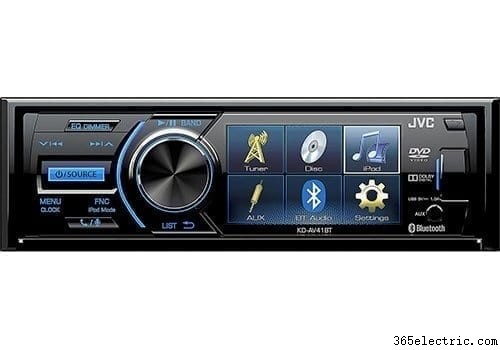
-
Se, ao se fazer todas essas perguntas, você ainda sentir que é necessário comprar e instalar uma nova unidade principal, aqui estão os próximos passos!
Ferramentas recomendadas para instalar um sistema de som automotivo
- Conjunto de chave de fenda Phillips e cabeça chata
- Alicates
- Descascadores de fios
- Chaves ou soquetes (geralmente 8 mm, 10 mm)
- Ferramenta de espionagem de traço
- Chave de remoção de estéreo (se necessário)
- Voltímetro
- Ferro de solda ou maçarico
- Soldar
- Retrátil de calor ou fita isolante
- OU grampos/grampos de fios (se você não quiser soldar)
1. Removendo o estéreo do carro
Bem, o primeiro passo para instalar sua nova unidade principal é remover a antiga! Para fazer isso, recomendamos que você abra o capô e desconecte a bateria antes de qualquer coisa. Dessa forma, você não causa curto-circuito nos fusíveis. Finding a blown fuse can be time consuming and frustrating so take our word that this will save you time in the long run. Once you have done this, start to remove the trim from around your stereo to access the mounting screws. I've found the trim removal instructions from Metra to be very helpful when you do this. In many cases, trim needs to be pulled in a certain direction to prevent cracking or breaking it. Metra does a great job at helping you visualize how to pull your trim off and where. Go to http://metraonline.com/, scroll down to the vehicle fit guide and enter your car. Once you've done this, click on one of the dash kits (this is the piece of plastic that you'll mount your head unit into. It replaces many parts of your trim to make a seamless fit for your new stereo). If you haven't already bought one of these dash kits, we HIGHLY recommend you do. It will simplify your install by 10 fold. Once you've selected one of the dash kits, click on the PDF link under the “Documents” on the left. You'll find full instructions for removing your trim step by step!
Your head unit will be mounted in one of two ways:
- Bolted to the dash with brackets and screws. This is the more difficult option to removing and where the Metra instructions will be extra helpful.
- Secured with mounting sleeve and spring clips. For this type, you'll want to purchase our recommended stereo removal keys.
Sticking and Stubborn Dash Trim It's worth noting that removing trim is probably one of the more difficult tasks in removing your car stereo. You're going to be lucky if you don't hit at least one trim piece that isn't a pain. In these cases, you really want to use a trim removal tool to wedge in between the gaps and gently work your way around the trim piece. Patience is key because once you break a trim piece, there's no turning back. Start in a corner and work your way around the piece.
Once you've removed your trim according to the instructions, dismount your factory stereo and disconnect the wiring on the back of the unit.
2. Wiring Your New Car Stereo
If Metra or Scosche carries a wire harness for your vehicle, we highly recommend purchasing one along side the dash kit. Again, you can use the same link from Metra (www.metraonline.com) to find the one for your vehicle. In the case that you can't find one, you'll need to do a little research on the web to find a list of stereo wire colors on your harness and match them up with the corresponding ones on the car stereo harness. You can find a diagram here of aftermarket car stereo wires. This will help you match the aftermarket up with your factory ones.
If you find that there is a custom wire harness for your car, it's very simple, just match up color for color the wires from your aftermarket head unit harness to your custom wire harness for your car.
Connecting the Wires There's two options for connecting the wires that you can use:
- Soldering – For all of the professional installs that I have done I would solder the two together. This ensures a permanent connection that will never short over time. It's more time consuming though. Here's how you do it:
- Strip the two wires 1/2 inch back.
- (Optional) Place 1 1/2 inch of shrink wrap on one side at least 4 inches behind the end of the wire.
- Overlap the two exposed wires and twist the two together until they are interconnected.
- Using a soldering iron or a soldering torch, heat the wire and feed in your solder slowly until it absorbs into the wire.
- Let cool and test the solder job by tugging on the two wires.
- After the wires cool, move your shrink wrap back over the soldered area. If you didn't use shrink wrap, apply electrical tape.
- Do this for each wire until all have been connected.
- Connectors – You can use butt connectors or crimp caps as well. This is a much more efficient way to connect the wires but in many cases I've seen these fail after a few years on the road. In any case, you'll either crimp the two wires together in a clamp by placing the wires in and clamping down on the crimp clam. Or your use but connectors to insert both ends into the connector and clamp both sides.
3. How to Install the New Stereo
Now that your wires are all completed you're ready to install the head unit. Connect all of the wires first. Ensure that there are no exposed wires that may be in contact with any part of the vehicle. We recommend connecting your battery and testing the stereo out prior to fully installing it back into the dash.
Once you've tested it (and it works!) you'll want to add the mounting brackets to your new head unit. If you have a dash kit, use the ones that come with the kit. If not, use the ones off of your factory stereo. If you have the dash and mounting kit, follow the instructions in the manual. If not, you'll need to test where the new head unit sits, and adjust your factory trim to make it fit. This is normally a difficult task. I'd recommend using a Dremel to make cuts and adjustments to the plastic.
Slide the stereo into the opening in the dash, ensuring that the wires behind are tucked and not pinched. Sometimes this may take a few times when the vehicle has a tight dash opening. Tuck the wires back into an opening behind the unit.
Parabéns! You're done! Let us know you you did and if you have any questions in the comments section.
Also be sure to check out our top rated lists:
Best Single Din Car Stereo
Best In-Dash GPS Navigation Unit
Best DVD/Multimedia Head Unit
Best Digital Media Receiver
