 Nós mostramos a você como obter suas melhores fotos de carros com essas ótimas dicas e truques, desde fotos épicas de carros ao ar livre até fotos perfeitas de interiores, este guia sobre fotografia de carros é para você.
 Ou talvez você queira vender seu carro da maneira mais rápida e fácil possível, com o maior retorno possível e, nesse caso, ótimas fotos de carros são essenciais!
Bem-vindo à
série AP Melhore sua fotografia – em parceria com a MPB – Esta série foi projetada para levá-lo desde os primórdios da fotografia, apresentar diferentes habilidades e estilos de fotografia e ensiná-lo a crescer como fotógrafo, para que você possa produzir fotografias (e vídeos) incríveis, para tirar você para o próximo nível, seja para ganhar dinheiro ou simplesmente dominar sua forma de arte.

A cada semana você encontrará um novo artigo, então volte para continuar sua jornada e divirta-se ao longo do caminho, criando ótimas imagens. Se você achou esses artigos úteis, não se esqueça de compartilhá-los com pessoas que você conhece que possam estar interessadas em aprender novas habilidades fotográficas. Você encontrará uma série de outros artigos nesta série.
Esteja preparado para colocar em prática o tempo para refinar sua técnica de panning. Fotos de Phil Hall e Andrew Sydenham
Mesmo que você tenha um interesse passageiro por carros, provavelmente folheou as páginas de revistas de carros brilhantes e olhou com inveja para algumas das impressionantes fotos de carros em exibição.
Claro, nem todos nós teremos acesso a um Aston Martin ou Ferrari, mas isso não deve impedi-lo de tentar fotografar carros. Vamos mostrar como é possível tirar ótimas fotos de carros, independentemente do motor que você possui. Não se esqueça também de que há também uma série de eventos que permitirão que você se aproxime de uma série de veículos impressionantes para experimentar algumas dessas ideias de fotografia de carros.
Ex-editor de técnicas da AP, Phil Hall agora é editor da heycar e do Honest John e explica tudo. Como capturar movimento em fotos de carros
Para criar uma sensação de velocidade e movimento em uma foto de carro, a panorâmica é inestimável. É uma das melhores maneiras de transmitir movimento, e você não está restrito a um carro específico, pois pode aplicar essa técnica em eventos automobilísticos ou simplesmente sentado ao lado de um trecho adequado da estrada.
Como se familiarizar com a panorâmica para fotografia de carros
Você pode ter tentado garimpar no passado, mas vale a pena recapitular. Panning é onde você segue seu assunto com uma velocidade lenta do obturador para desfocar o fundo, mas mantém o ponto de interesse nítido à medida que o assunto passa na sua frente.
Configurações da câmera para panorâmica
A velocidade do obturador que você escolher dependerá da velocidade do carro, então esteja preparado para um pouco de tentativa e erro. Um bom ponto de partida para um carro viajando a 30-40 mph é em torno de 1/80s, embora fotografar em condições de luz do dia geralmente signifique diminuir o ISO para 100 ou 200 e parar a lente em f/11.
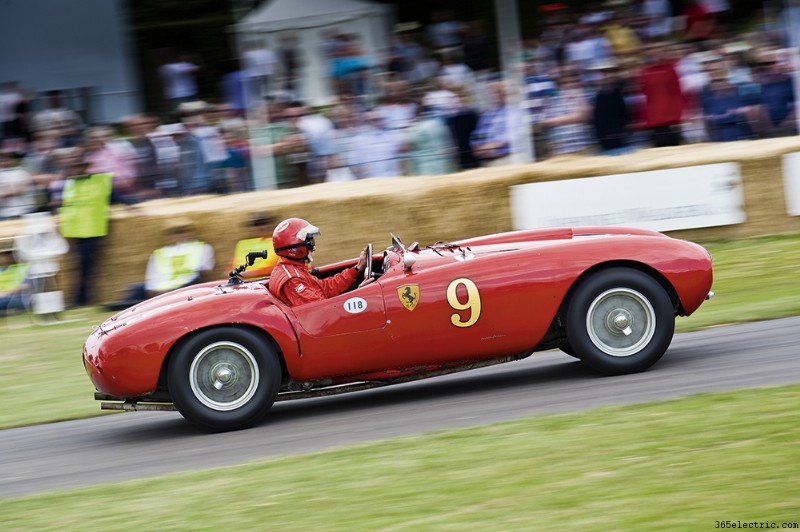
Eventos como o Goodwood Festival of Speed são ótimos lugares para experimentar o panning.
A opção de usar o AF da sua câmera pode produzir resultados mistos - se acertar, não pode ser culpado, mas você pode descobrir que sua câmera pode focar incorretamente ou parar no ponto errado do carro. Uma alternativa é focar em um ponto da estrada onde você sabe que o carro vai passar e então mudar para o foco manual. Como você provavelmente estará fotografando em uma profundidade de campo relativamente grande, você pode garantir que seu foco seja preciso e se concentrar totalmente em seu posicionamento em relação ao carro.
Como se posicionar durante o movimento panorâmico
Sempre que possível, você quer chegar o mais longe possível do carro que passa, garantindo também que tenha bastante espaço no quadro à medida que ele passa - isso também será útil mais tarde ao cortar, pois você pode inclinar ligeiramente a imagem acentuar a sensação de velocidade. Uma lente zoom telefoto é ideal para isso.
Tente evitar mover os pés ao fazer a panorâmica, então posicione-os ligeiramente afastados voltados para a frente, usando o tronco para girar da esquerda para a direita enquanto segue o assunto. À medida que o carro se aproxima, siga-o em um movimento suave e fluido, apenas disparando o obturador quando o carro estiver perto o suficiente. Não desanime se você não acertar na primeira vez – a panorâmica requer muita prática e paciência. Faça certo e você será recompensado com fotos impressionantes de carros.
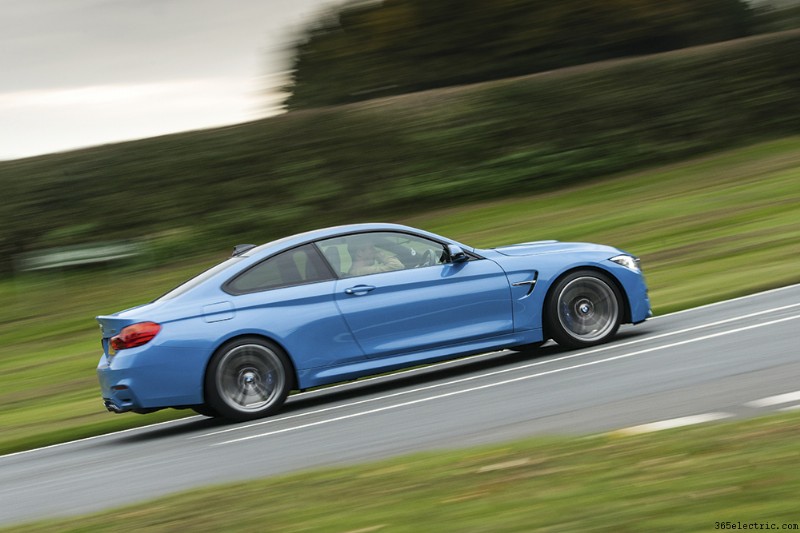
Acelere a fotografia do seu carro com uma foto de rastreamento
Embora a panorâmica exija que você mova sua lente na mesma velocidade que um veículo em movimento passando à sua frente, uma alternativa é fotografar ao lado dela em um carro em movimento secundário.
Tal como acontece com a panorâmica, você precisará fotografar com uma velocidade do obturador lenta o suficiente para introduzir essa sensação de movimento, mas combinando a velocidade dos dois veículos, o carro que você está fotografando permanece nítido. Em vez de usar uma lente de zoom telefoto, você pode tentar um zoom padrão ou até mesmo uma grande angular. Lembre-se, porém, que isso não deve ser tentado em vias públicas.
O rastreamento de outro carro pode fornecer excelentes resultados.
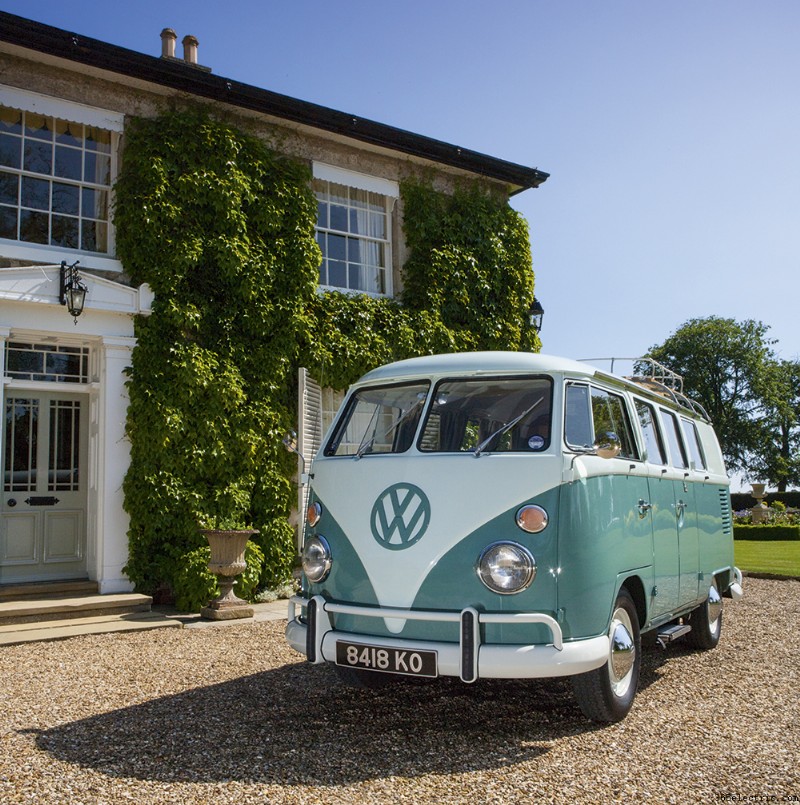
Como fotografar carros no local
Os carros nem sempre precisam estar em movimento para uma fotografia automotiva bem-sucedida – uma foto de localização de carro estática pode ser igualmente impressionante.
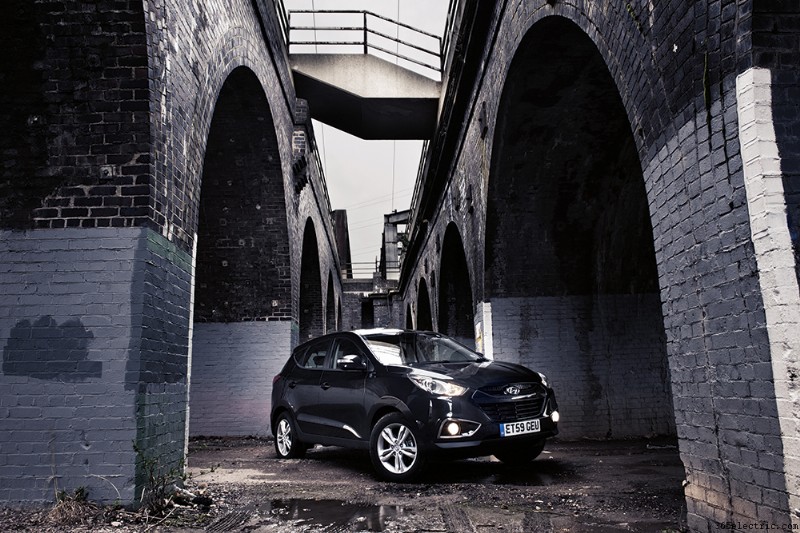
Escolha sua localização
A localização que você escolhe depende muito do carro que você possui, portanto, se você optar por urbano e industrial ou rural e pitoresco, ele precisa complementar ou contrastar com o estilo e a idade do carro que você está fotografando. No entanto, onde quer que você decida atirar, é importante verificar se você tem permissão para fazê-lo.
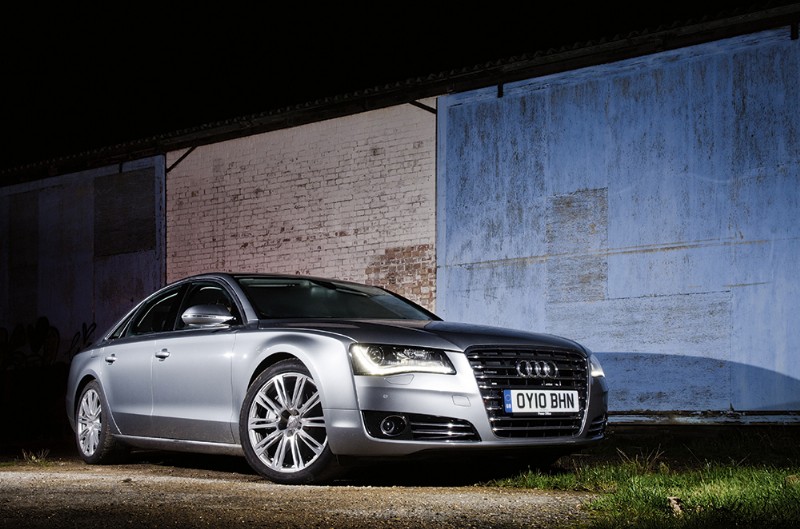
Pense em como você vai acender o carro
Depois de classificar o local, você precisa pensar na iluminação. Se você estiver trabalhando em um local dramático ou quando o sol estiver um pouco mais baixo no céu, convém optar pela luz natural.
Alguns locais funcionam muito bem se você injetar alguma iluminação adicional e realmente destacar seu carro. Embora a iluminação de localização dedicada seja útil, você ainda poderá fazer isso de forma eficaz com um ou dois flashes, juntamente com alguns suportes e modificadores de iluminação. Os resultados podem ser muito impressionantes, especialmente se você subexpor propositalmente o fundo em algumas paradas e expor corretamente para o carro – uma combinação que cria uma foto de carro impressionante.
Escolhendo a lente certa para fotografia de carro no local
Embora você possa obter uma visão mais ampla ao fotografar carros no local, uma distância focal de telefoto também pode ser uma opção útil - uma lente de 85 mm em uma câmera full-frame funciona bem ou um zoom de 70-200 mm. Abaixe-se no chão – tente até mesmo deitar-se – pois a perspectiva comprimida produzirá uma imagem dramática. É aqui que você pode querer virar a tela e usar o Live View para compor sua foto.
O plano de fundo que você escolher desempenhará um papel crucial na imagem final.
Como compor as fotos do seu carro
Ao fotografar um carro no local, é importante pensar no posicionamento do carro. Esteja preparado para mover o carro um pouco para acertar o enquadramento, enquanto você pode querer pensar em girar as rodas dianteiras no quadro - se elas estiverem apontando para frente, isso pode tirar um pouco do dinamismo da foto.
Fotos de uma elevação mais alta também funcionam bem, pois é um ângulo do qual não vemos um carro com frequência. Você pode encontrar um ponto mais alto para atirar, mas como isso nem sempre é possível, vale a pena levar uma pequena escada com você.
Detalhes e interiores do carro
Em vez de tentar fotografar o carro inteiro, adote uma abordagem diferente e concentre-se em detalhes interessantes, pois na maioria das vezes é isso que torna um carro único. Arme-se com um zoom padrão, ou um prime rápido como um 35mm ou 50mm, se você tiver um, e mova-se gradualmente pelo carro procurando pontos de interesse. Isso pode ser um emblema, uma grade do radiador ou simplesmente uma curva na carroceria, mas quando seus olhos forem atraídos para um ponto, procure obter o melhor ângulo, seja para baixo ou para o lado.
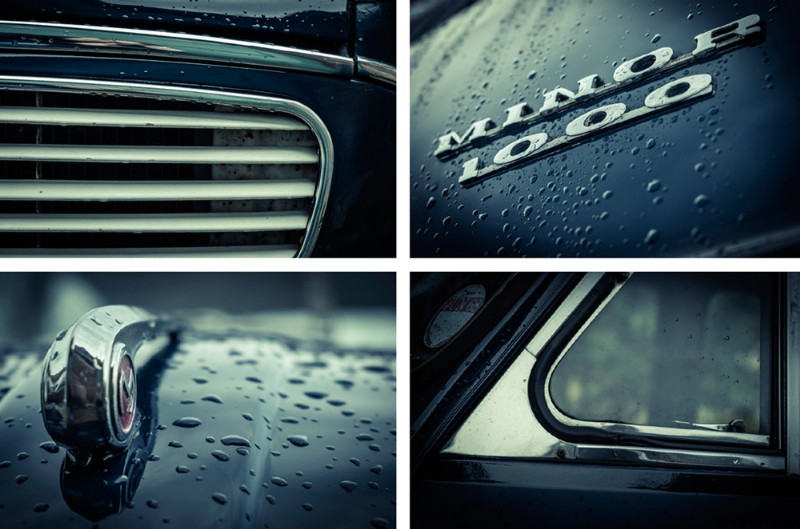
Percorra o carro à procura de pontos de interesse
O carro que você fotografa também não precisa estar em boas condições (embora precise estar limpo) – na maioria das vezes, um carro que parece ter sido usado fielmente será um assunto melhor. Apenas tome cuidado ao trabalhar perto do carro, pois você precisará ficar atento aos reflexos, especialmente se o carro estiver pontilhado de cromo. O clima também desempenha um papel importante – um dia nublado pode funcionar muito bem, pois a luz difusa suave significa que você evitará sombras fortes, enquanto o brilho quente do início da manhã ou do final do dia pode adicionar um elemento extra à sua foto.
Como tirar boas fotos do interior do carro
Assim como o exterior, quando se trata de fotos internas de um carro, você pode se concentrar em detalhes específicos. Try and use a relatively ‘fast’ aperture lens – a standard prime with a maximum aperture of f/1.8 or faster will be ideal as it not only allows you to put the background in relief, but it also means you can shoot at workable shutter speeds when shooting handheld.
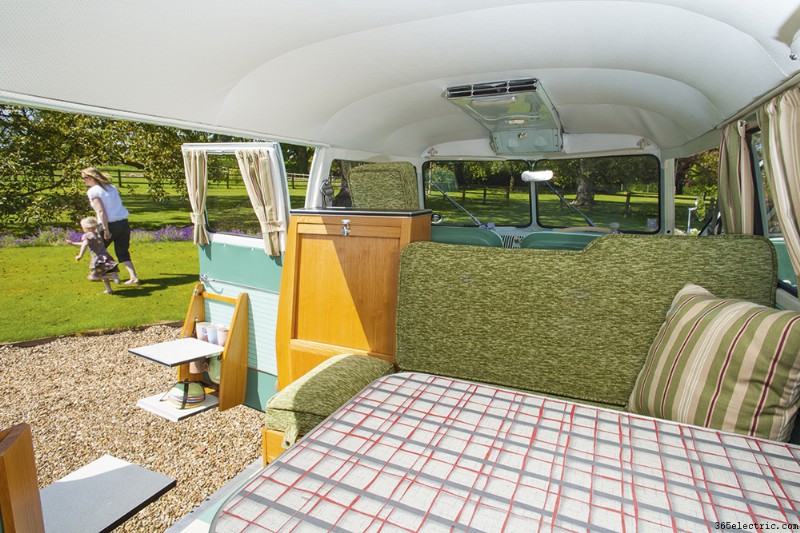
A wideangle lens will be necessary when shooting interiors
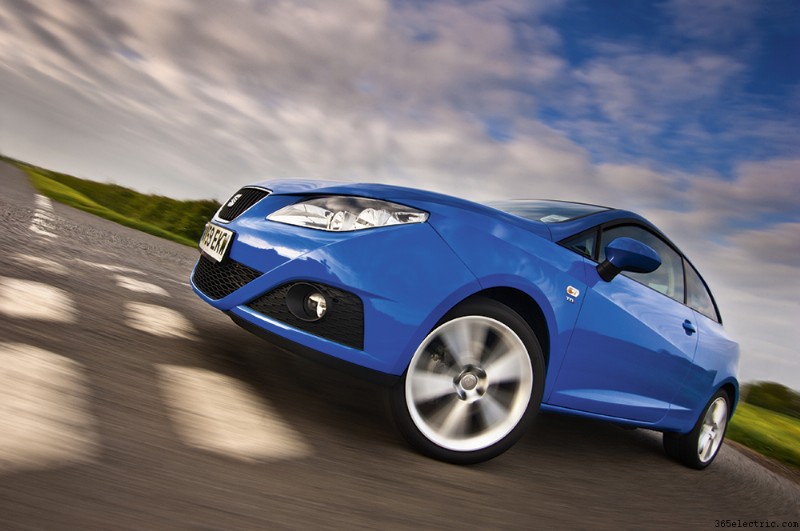
How to photograph cars for sale
If you’re looking for photograph your own car with a view of listing on a website like www.carsite.co.uk, then there are a couple of things to consider before you start.
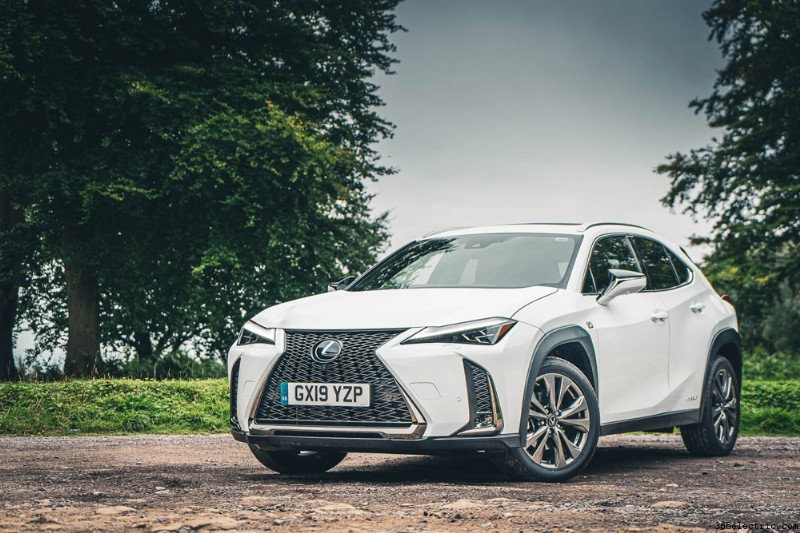
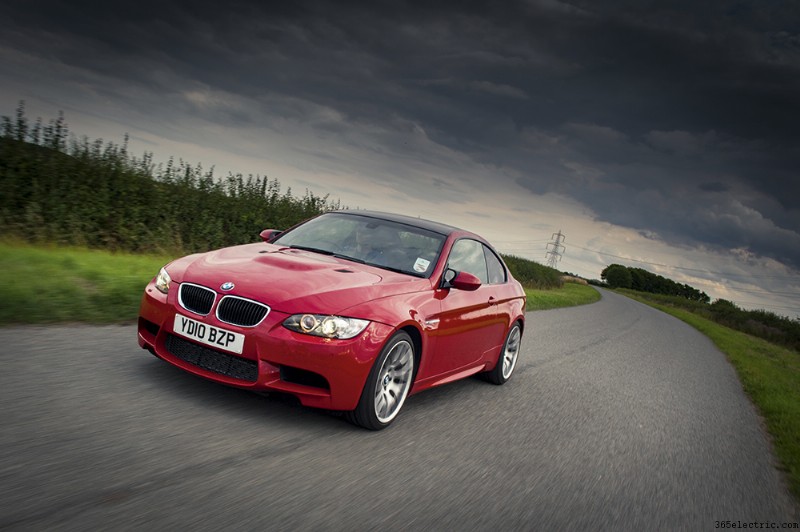
Phil Hall, Lexus, Car photography, taken with the Sony A7 Mark III
The car needs to be centre stage, so rather than looking for a dramatic landscape for the car to sit in, you want a fairly unobtrusive background that isn’t a distraction from your car. A quiet car park in the countryside can be a great spot.
It might sound obvious, but before taking any photos, make sure your car is clean. Give it a thorough wash before you shoot and take some cloths with you to get rid of any dirt that might have built up on the journey to your location.
For the exterior shots of your car, try and get as many shots as possible – take front, back and side profiles, as well as a three-quarter shot of the car that you can use as the main image. Get some close-ups of each wheel to clearly illustrate the alloy wheel condition, before moving to the inside.
You don’t need moody details of the interior – instead, you want to achieve a brighter, airier look. A large piece of white card (A1 or A0 size will do the job and can be found in art shops) is perfect for lighting shadows, while a wide-angle lens will let you cram in as much as possible and make the car’s cabin appear nice and large.
How to photograph cars at night
Introducing a car into your low light photography can work really well. Taking your car into the city at night can provide loads of excellent locations (provided you have permission to do so), while light trails can really add some energy to a shot. Another technique to try when photographing a car at night is light painting.
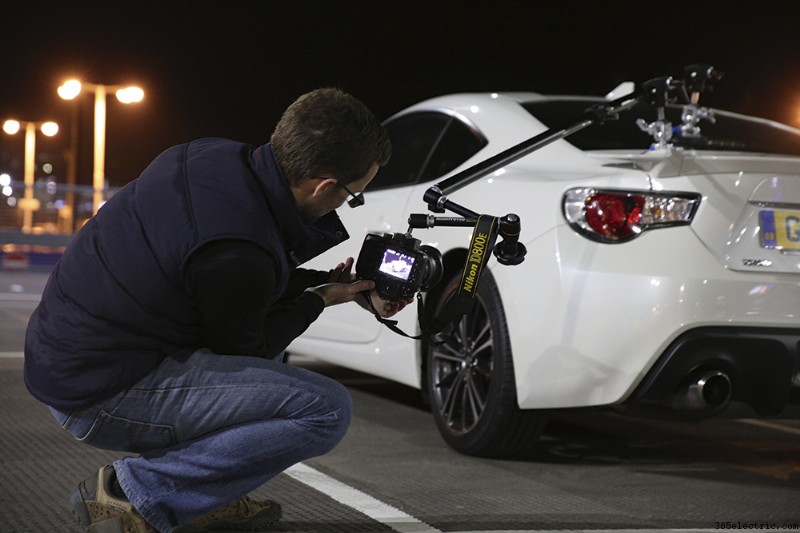
Painting with light
Almost like modern-day pieces of sculpture, cars lend themselves perfectly to painting with light, as it really allows you to reveal the shape and form of the bodywork. You don’t need a huge amount of expensive kit, either, as a flashgun or torch will do a decent job to get the ball rolling. For more control, though, you can look at using an LED panel. For this shot we used the Gloxy Power Blade that has 298 LEDs grouped together in a strip, but there are a range of options to suit all budgets. While different light sources will produce slightly different results, the principles for a successful shot remain the same.
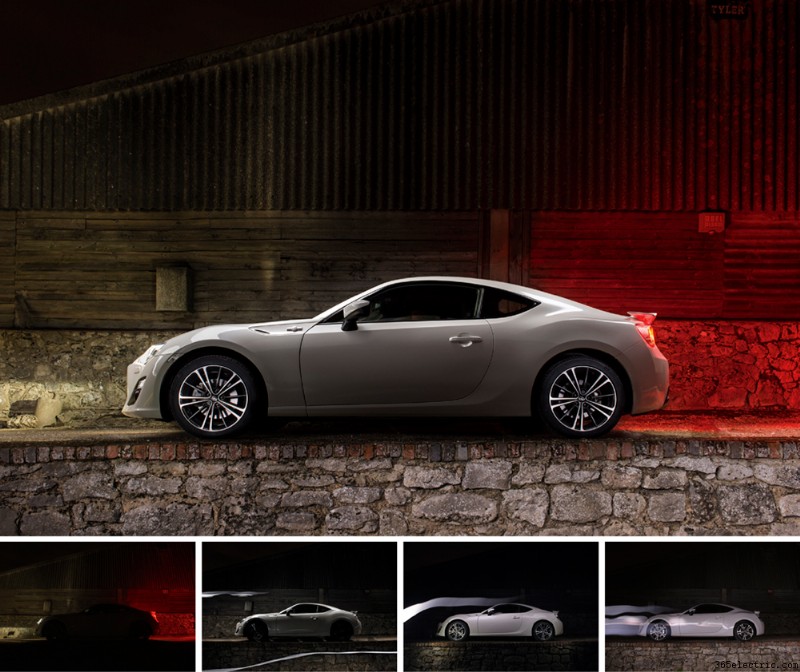
Work on individual elements of the car for each shot, then merge the image into a single photo. The final composite image is made up of the four separate shots. Car shown (GT86) kindly supplied by Toyota GB
Light painting basics
Pick your background. In this case we opted for an old farm building to contrast with the clean, defined lines of the car, but an urban background could work just as well. Also remember that you need to consider the amount of ambient light in the area – you want as little as possible, otherwise it risks encroaching on the scene and ruining the image.
Once you’ve got your location sorted, it’s time to set up. If you can, bring a friend to help out. Not only can they collaborate on the shoot (life’s a lot easier with someone firing the shutter), but it’s always good to have some company if you’re working in the dark at night.
Camera settings for light painting
With your camera placed on a tripod, working in the dark can make focusing tricky, so get your friend to throw some light on the car while you set the focus. Once you’re happy, lock it off and then dial in the exposure. Set the ISO at 100-200 and then, as a starting point, set the aperture at f/11 and an exposure at 30secs.
This shot was constructed from multiple images lit with a single flashgun
Unless you’re extremely lucky, you’re not going to get the perfect shot in a single capture. Instead, you want to build up elements of the shot that can then be merged later in Photoshop, so it makes sense to pick out the elements you want to work on. One could be the cabin, another could be the side panels and another the wheels, while you might also want to bring in elements of the background. If you want to include the head and tail lights, do this separately first. Then switch them off and start your light painting. Try to keep your movements as smooth as possible and shield them from the lens. Once you’ve taken a variety of shots, it’s time to pack up and head home to blend them together.
Car Photography – Top tips
When shooting in some locations, make sure you get permission first
Keep it clean
When shooting cars, the most important thing to do is to make sure the car is clean. However good you are at Photoshop, you’ll struggle to ‘clean’ a car digitally. Get it cleaned thoroughly before you shoot and take some cloths with you to get rid of any dirt that might have built up on the journey.
Cleaning up an image – Step by step guide
1. Select images
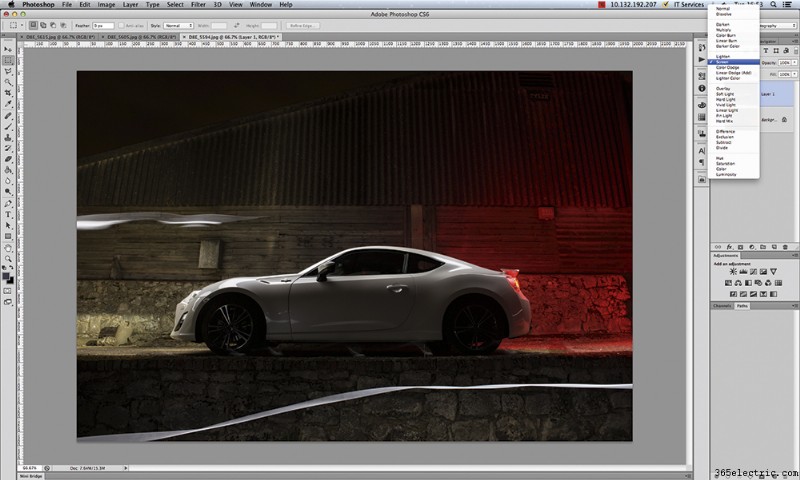
Once you’ve selected the images you want to use, batch convert the raw files in Lightroom or Photoshop. Then, with an ambient headlight shot working as your background layer, paste in another image and change the Blending Mode to Screen.
2. Layer mask
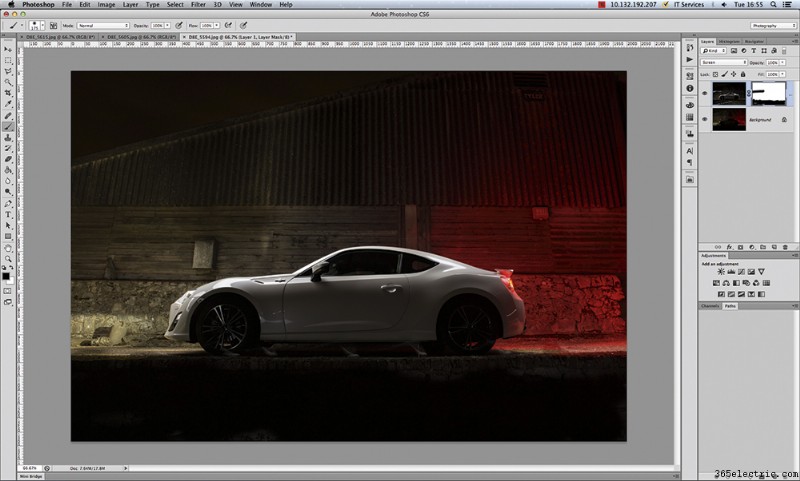
You may want to hide some elements of the image, so with Layer 1 selected, create a new Layer Mask and with a black Brush, run over the areas to you want to remove. You can then look to add your next layer.
3. Fill to black
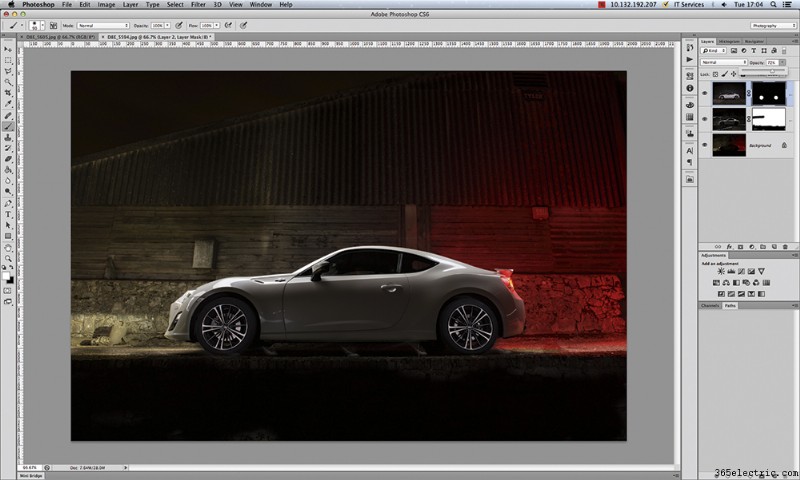
Some layers don’t need a Screen Blending Mode. Instead, apply a Layer Mask filled Black before using a White brush to reveal certain areas – in this case we only wanted to have the wheels show in this layer. Continue until you’re happy with the look.
Car photography kit list
- Gloxy Power Blade – With a long beam of solid and neutral light, this is a great piece of kit to use for illuminating a car.
- Flashgun – While not quite as precise as an LED light, your humble flashgun can still deliver decent results.
- Torch – If you don’t have any LED lights, try using a torch for a similar effect, although be prepared for a slightly warm result.
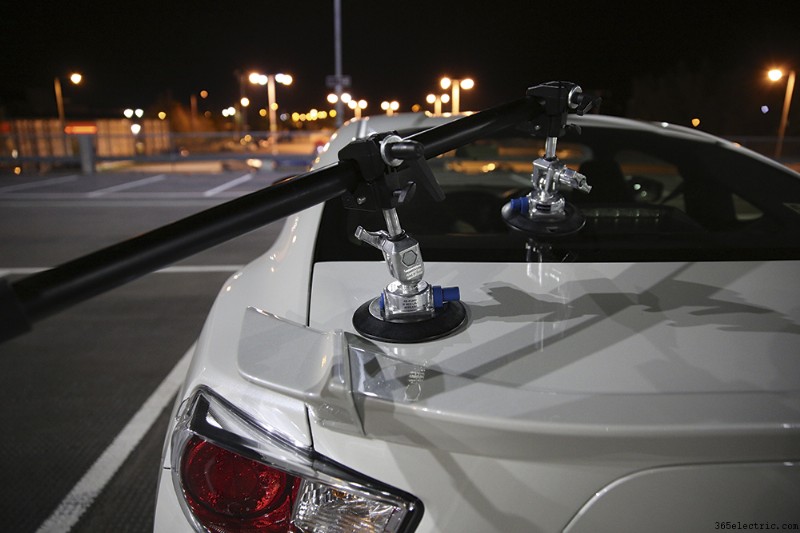
How to use a car mount for car photography
The car mount uses suction cups to form a bond with the car
If you want to take things a little further, you can look at using a camera rig. By temporarily fixing a rig to the car in this way, you’re allowing the camera to move at an identical speed to the car, introducing motion blur into the shot while keeping the car pin-sharp and adding a real sense of movement to the image.
You’ll find camera rigs in all shapes and sizes, but a popular choice is to use a couple of Manfrotto pump cups, Manfrotto super clamps and a telescopic pole with a Manfrotto magic arm attached, onto which you can then lock the camera. Because you’re shooting relatively close to the car, you’ll need a fairly wide focal length – something like a 16-35mm on a full-frame DSLR fits the bill perfectly. That’s not forgetting a whole lot of faith as you let your camera kit dangle from the car as it moves along. But don’t worry, it won’t actually be travelling that fast. More on that in a moment.
In use
When setting up a shot with a rig, front or rear three-quarter images tend to work best, although you should discount detail in front or rear shots. Just remember that there is no getting away from having the rig appear in your shot and it’s going to have to be removed later in post-production. One thing you can do to make life easier in Photoshop is to position the camera upside down so the telescopic arm is rising from the camera, as it’s much easier to clone a pole out against a sky or background than it is to have to rebuild sections of the bodywork.
This can make composition a little tricky, especially as you’ll potentially be working at awkward angles. However, this is where live view becomes extremely useful, as it makes it much easier to frame your shot. Once you’ve got your focus, it’s best to lock it off in manual to avoid the camera’s AF shifting focus inadvertently when shooting.
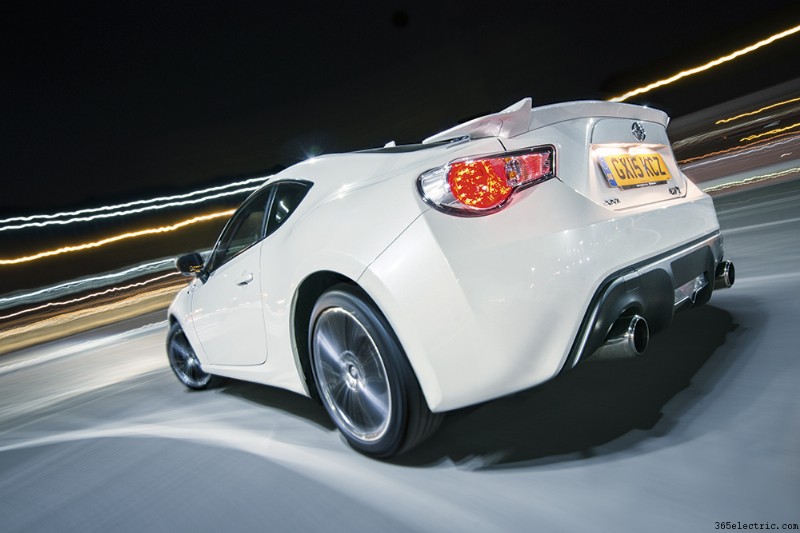
The final shot, once the car mount has been cloned out in post-production
Shutter speeds
Just like panning, getting the right shutter speed is the real key to the success of the final image. You need to be slow enough to introduce blur into the shot, but not so much so that you risk compromising image sharpness.
If you’re shooting in daylight, start by dropping your ISO down to 100-200 and in shutter priority mode, experiment with shutter speeds of 1/15-1/60sec as a starting point. You’ll find that the car only needs to be moving at around 5-10mph to introduce blur and make it appear as if it’s travelling much faster. If you’re struggling to achieve a balanced exposure – it may be too bright, for instance – pop a neutral density filter on the front. When it comes to night shooting, try a shutter speed of around 1-1.5sec as this will render lights as long light trails.
Avoiding vibration
With a long telescopic arm protruding out from the car, it will be no surprise to hear that vibration can become an issue, introducing loss of sharpness in the image. Some photographers like to attach guide lines from the telescopic arm to the corners of the car for extra stability, but simply holding the camera as the car moves can help. It is important to look for smooth roads and make sure the car maintains a consistent speed.
Alternatively, rather than shooting with the engine on, you can simply push the car to minimise the effect of engine vibration. If you try this and you’re still having trouble with unwanted vibrations, one trick is to shoot a static shot and then blend it with the moving image later.
Finally, triggering the shutter. You can use a remote trigger such as PocketWizard Plus IIIor, if your camera has one, you can use its intervalometer to fire a series of shots in quick succession as the car moves along.
Rather than shooting with the engine on, you can push the car to reduce vibration
Car mount – kit list
- Hague SM11 telescopic mount rig – You can build your own rig from individual parts, but Hague’s all-in-one solution is a great option at £276.
- Manfrotto Magic Arm – The Manfrotto Magic Arm with a super clamp (£112) offers a bit more flexibility when it comes to framing your shot.
- Remote Trigger – To fire the shutter as the car moves along, a remote release is essential. Happily there are numerous options available on the high street.
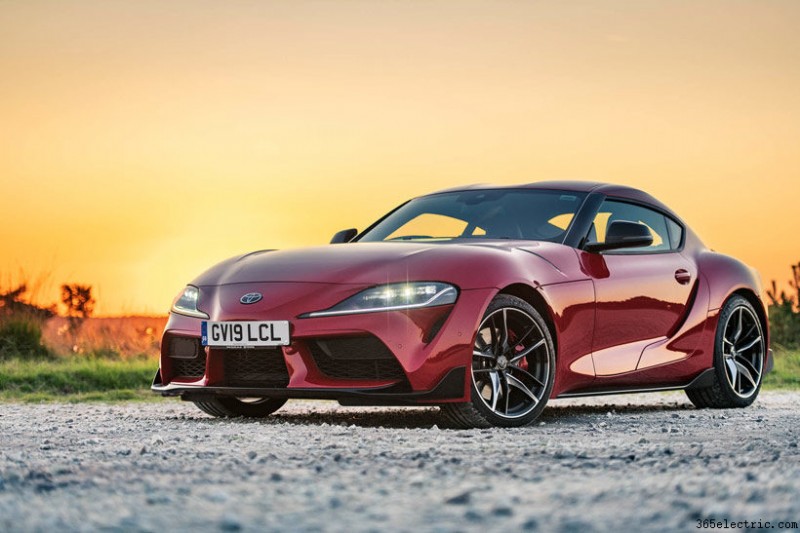
Now you’ve learnt some of the best methods for improving your car photography, why not share some of your images with us on Facebook, or Twitter. Featured image:Phil Hall, Toyota Supra, taken with the Nikon D850. Tune in next week, for the next article in the series of the
AP Improve Your Photography Series – in partnership with MPB.
- Part 1: Beginners guide to different camera types.
- Part 2: Beginners guide to different lens types.
- Part 3:Beginners guide to using a camera taking photos.
- Part 4:Beginners guide to Exposure, aperture, shutter, ISO, and metering.
- Part 5:Understanding white balance settings and colour
- Part 6:10 essential cameras accessories for beginners
- Part 7:Beginners guide to the Art of photography and composition
- Part 8:Beginners guide to Photoshop Elements and editing photos
- Part 9:Beginners guide to Portrait Photography
- Part 10:Beginners guide to Macro Photography
- Part 11:Beginners guide to Street Photography
- Part 12:Beginners guide to Landscape Photography
- Part 13:How to shoot Action and Sports Photography
- Part 14:How to shoot wildlife photography
- Part 15:Raw vs JPEG – Pros and cons
- Part 16:How to create stunning black and white images
- Part 17:How to photograph events and music
- Part 18:Pet photography – how to photograph pets
- Part 19:The ultimate guide to flash photography
- Part 20:The ultimate guide to tripods
- Part 21:Create awesome photos with light painting
- Part 22:Beginners guide to file and photo management
- Part 23:How to shoot food photography
- Part 24:Complete guide to outdoor light
Find the latest Improve Your Photography articles here.
