No modo de rede, os auto-rádios produzem três tipos de saídas – saída de alta frequência, saída de frequência média ou banda passante e saída de baixo alcance.
Mas qual é o modo de rede e como configurá-lo corretamente? Vamos descobrir.
Modo de rede é usado para configurar tweeters, midrange e um woofer dos canais de saída separados no estéreo do carro. Junto com isso, você também deve alterar o modo de operação para o modo de rede no rádio do carro. Neste artigo, vou me aprofundar em como usar o modo de rede no rádio do carro e quais são os requisitos de arranjo dos alto-falantes nesse modo.
O que é o modo de rede no rádio do carro?
Cada estéreo do carro possui recursos de áudio avançados integrados. Um rádio de carro pode ser configurado no modo padrão ou no modo de rede de três vias.
No modo de rede, você configura as saídas de áudio como alta, média e baixa porque esta é uma saída de três vias:
- a saída de alta frequência é para tweeters
- saída de frequência média para alto-falantes de médio alcance
- e saída de baixa frequência para subwoofers
Portanto, no modo de rede, você pode conectar esses três ao sistema de áudio do carro.
Você deve se lembrar de que perderá todos os dados armazenados no estéreo quando reiniciar o rádio do carro. Portanto, sua cor desapareceu, as predefinições desapareceram, seu telefone ou dispositivos conectados foram excluídos.
Para verificar se o rádio do seu carro está no modo padrão ou no modo de rede, carregue o disco e vá para “
configurações de som .”
Role para baixo e vá para “
nível do alto-falante .” Você verá dois tweeters, dois médios e um subwoofer, dependendo dos recursos do rádio do seu carro. Isso significa que o rádio do seu carro está no modo de rede.
Qual é a diferença entre o modo padrão e o modo de rede?
Quando você liga o rádio do carro pela primeira vez ou faz uma redefinição de fábrica, ele solicitará que você selecione o idioma primeiro e depois escolha entre o modo padrão e de rede.
O modo de rede é um sistema de saída de 3 vias, enquanto no modo padrão, o rádio do carro tem saída de áudio de 2 vias, mas essa não é a única diferença.
Existem duas diferenças principais entre o modo padrão e de rede –
- A diferença nas saídas RCA
Vamos vê-los um por um.
A diferença nas saídas RCA
Ao olhar para a parte de trás do estéreo, alguns têm três conjuntos de saídas RCA para operar amplificadores externos.
Par superior de saídas RCA
No modo padrão, o conjunto superior de saídas RCA são as saídas de áudio frontais. São saídas de áudio full-range de todas as fontes, incluindo Bluetooth.
No modo padrão, as chamadas telefônicas Bluetooth são ouvidas pelas saídas RCA frontais ou pelos alto-falantes frontais.
No modo de rede, o conjunto superior de saídas RCA torna-se saídas de áudio de alto alcance usadas para conectar tweeters. Portanto, ao escolher o modo de rede, você não receberá chamadas telefônicas pelos canais frontais.

Par Médio de Saídas RCA
No modo padrão, o conjunto intermediário de RCAs é para alto-falantes traseiros. Nesse modo, são saídas de áudio de alcance total e nenhuma chamada telefônica é ouvida dos alto-falantes conectados a essas saídas.
No modo de rede, o RCA intermediário se torna as saídas de áudio de médio alcance e os sinais Bluetooth para as chamadas telefônicas também estão sendo enviados por meio dessas conexões RCA. Além disso, você pode aplicar o filtro passa-alta e o filtro passa-baixa a esta saída no modo de rede.
Par inferior de saídas RCA
O terceiro par de saídas RCA é usado para o subwoofer no modo padrão e em rede.
Uso de cruzamentos
- No modo padrão, o sistema usa um crossover passivo.
- No modo de rede, o sistema usa os cruzamentos internos do rádio do carro. Portanto, o modo de rede oferece mais flexibilidade na configuração de pontos de cruzamento do que cruzamentos passivos.
Eu escolho o modo de rede ou o modo padrão no meu rádio?
O modo de rede e o modo padrão são duas maneiras fundamentalmente diferentes de conectar, configurar e instalar o som do seu carro.
A escolha de usar seu estéreo no modo padrão ou de rede depende do tipo de sistema de áudio do carro que você deseja.
Por exemplo, se você deseja um arranjo de áudio com alto-falantes coaxiais de amplo alcance padrão conectados na porta frontal, traseira e um subwoofer na parte traseira, você deve escolher o modo padrão.
No modo de rede, o estéreo fornece três saídas:
Portanto, se você for configurar um subwoofer, midrange e tweeters, escolha o modo de rede no estéreo do carro.
Agora, a próxima pergunta que muitas vezes vem à mente é:
Eu tenho um alto-falante coaxial na porta traseira, um tweeter e um midrange na porta da frente e um subwoofer no porta-malas. Devo usar o modo de rede?
A resposta é NÃO porque o arranjo é para os canais frontal, traseiro e sub-canais, mesmo que você tenha drivers de áudio diferentes.
A maneira mais fácil de pensar nisso é se você tiver um alto-falante traseiro, então você não está usando o modo de rede.
Ao fazer ajustes nos sistemas no modo de rede ou no modo padrão, lembre-se de que as saídas de nível do alto-falante sempre fornecem a mesma frequência que você pode comparar com as saídas RCA.
How to Set up Network Mode In-Car Radio
Setting up the network mode is not complicated, and I will use the
Pioneer AVH 2400NEX for the example below so that you can follow it directly.
However, most Pioneer radios have the same settings, so there should be no differences in the process.
For New Car Radio
If you have a new car stereo, follow these steps to set up network mode:
- If your car radio is brand new and it has powered up for the first time, then the first thing you have to do is select the “language.”
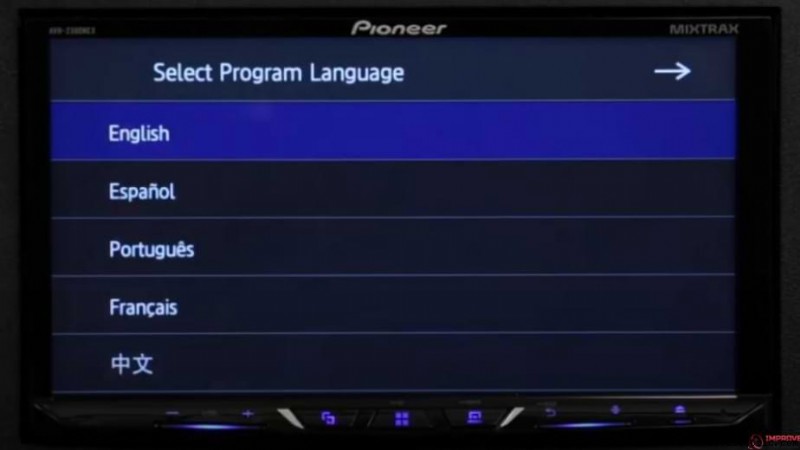
- After choosing a language, the next question you see is the fundamental setup question regarding the audio system. Again, you will see two modes – standard mode and network mode.
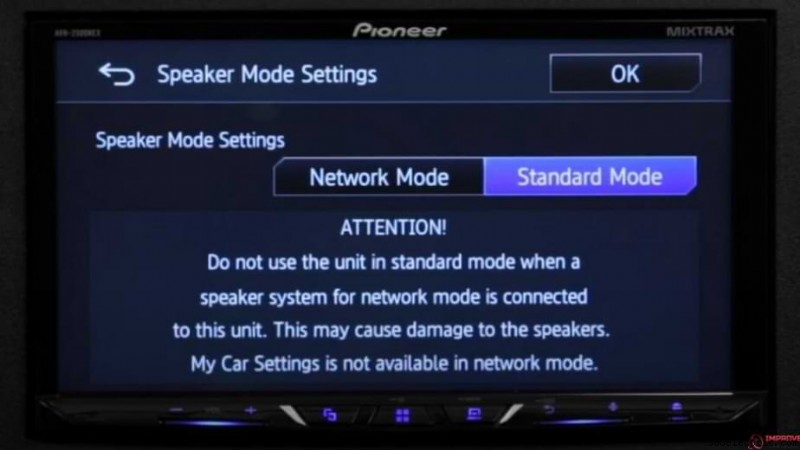
- Select the “network mode,” press OK, and now your stereo is in network mode.
For Old Car Radio
Now, what if your car radio is not brand new or already in standard mode?
Most people are already using their car radio in standard mode. To put the car radio into network mode, follow these steps.
Restore Car Radio
- Go into the “settings” of your car radio. Scroll up and hit “Restore Settings,” then hit “restore.” Wait patiently, and it will restore the settings of your car stereo like that of a new one. Each stereo has a slightly different procedure to restore settings, so you should read the device manual to find out how to restore factory settings.
- Now select the language of your car radio, and the next thing you have to choose is “network mode.”
- Congratulations, your stereo is now in 3-way network mode.
How to Connect Speakers to a Car Radio in Network Mode?
After choosing the network in your radio, the next thing is to hook up the tweeters, subwoofer, and midrange speakers to the car radio.
When setting up this system, it is critical to understand the frequency response of the tweeter and midrange driver package.
- First, you have to connect the tweeters. If you are using an amplifier, the steps remain the same. The front RCA – white and grey have to be connected to tweeters.
- The next are the midrange speakers, which you must connect through purple and green rear RCA outputs. This is important because of the crossovers, the volumes, and the time connections. So, you have to get this portion right.
- There is no deck power for the subwoofer. The RCA connections for the subwoofer are the only ones that do not change between the standard and the network mode.
The above steps explain how the 3-way network system is connected. The whole idea of doing network mode is to throw passive crossover away from the car sound system because passive crossover is a power-robbing device.
There are various advantages of using car radio in network mode rather than passive crossovers.
In network mode, you have more control over the frequency settings, and you can pick up crossover points, for example, at 6, 12, 18, 24 dB.
Most tweeters also have an attenuation circuit that allows you to attenuate like +3dB, 0, or -3dB in the standard mode, but when your radio works in the network mode, the volume control allows you to attenuate (gain it up or gain it down) the tweeter any way you want.
How to Adjust Crossover Points in Network Mode?
The confusion many people will face is when it comes to the crossovers. It isn’t obvious for beginners and may need professional help, so let’s go through the basics.
As a general rule, the frequencies should be set at the crossover as follow:
- For tweeters, tune the crossover points to the high frequency range
- for midrange, adjust crossover points to mid-frequency output
- tune the subwoofer to low frequencies
Here are the steps to set crossover points in network mode:
- Open the speaker settings in the stereo, go to the “balance ,” and you will see a screen that shows a balance between left and right speakers.
- Now go to “crossovers ,” and you will have features like high pass filter, mid low pass, mid high pass, and subwoofer. There are also numbers appearing on the screen that show crossover points.
- For any high pass filter, you can set the crossover at 1.25K, 1.6K, 2K, 2.5K, 3.15K, 4K, 5K, 6.3K, 8K, 10K, and 12.5K, but these points may be slightly different in different stereos.
- The crossover is critical as it protects your speakers from blowing, so you have to get it right. What I recommend doing is to connect each speaker individually and listen to them one by one. While adjusting crossover points, you want to make sure that you are not getting any undesirable sound or distortion from them.
- After this, play the speakers in pairs. For example, play tweeter and midrange together and see how they sound or play tweeter and subwoofer together, adjust the crossovers and see if they are producing any distortion or not.
In the following steps, I will show you exact crossover points for all drivers.
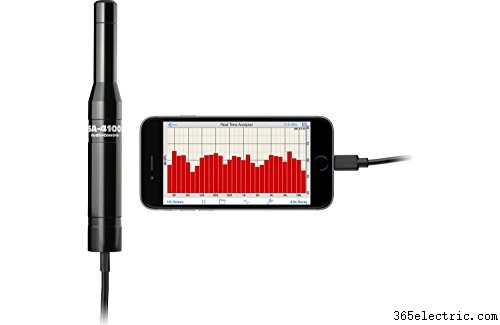
For this, you may need an RTA (real-time analyzer), which is a PPA 3 device (personal audio assistance). The screen on RTA shows you how your sound looks and what it does to the speakers. If you do not have the RTA, much more affordable options is to use the
AudioControl SA-4100i Omni-directional Audio Test and Measurement Microphone to measure not only frequencies for each speakers, buy also its polarity that is critical for the best sound quality.
The best is to use the pink noise tracks to analyze the sounds. Pink noise puts out a flat-level sound ranging from 20Hz to 20,000Hz (human hearing range), and when adjusting the crossovers, you can see the exact sound level on each frequency on the RTA screen.
Now you have arranged your stereo and RTA screen, follow these steps to set up crossover points in network mode.
- Connect the RTA screen to the high-frequency output of a car radio.
- Go to “crossovers ,” and for a high pass filter. An excellent place to start is 8K, giving you a 6dB slope. This means that the tweeter will play down to 8KHz but not lower than that. As you adjust the crossover points, the graph on the RTA screen changes. Our main motive is to adjust the crossover points such that the tweeter gets tuned to high-level frequencies.
- Connect the RTA screen to the car stereo’s mid-range or bandpass frequency output. You will see that the mid-high pass filter is turned off, and it shows a pretty much flat response on the RTA screen.
- Turn on the mid-high pass filter by clicking on the “HPF,” and it will display “HPF On.” Adjust the crossovers so that it covers the mid-range frequencies. The ideal crossover point is 10K, or you can see the frequency ratings on speakers and adjust accordingly.
- In the same way, adjust the crossover points of the low pass filter.
Up to this step, you have tuned midrange, tweeter and now let’s adjust the subwoofer.
- To tune the subwoofer, connect the RTA screen to low-frequency outputs of the car radio. Click on this sign (<) , and it will take you to the subwoofer.
- Adjust the crossover points for the subwoofer to tune the low-level frequencies. For subwoofers, you should set the crossover points at 80Hz.
Conclusão
When switching between network and standard modes, please be aware that just changing modes on the stereo is not enough. You have to completely change your audio system, including the speakers and the amplifier wiring.
Changing modes just on the stereo without other adjustments will damage your speakers if you don’t take time to rewire your stereo, so it is crucial to understand the differences between the standard and the network modes.
