O que é um Patchbay?
Um patchbay funciona como um hub para conectar todos os componentes do seu estúdio, incluindo microfones, pré-amplificadores, efeitos externos, mixers, fones de ouvido ou qualquer fonte ou destino de áudio em seu sistema.
Antes de ter um patchbay, eu estava constantemente desconectando e reconectando cabos das entradas e saídas do meu equipamento. Mas agora posso deixar tudo conectado ao patchbay e simplesmente usar um patch cable para fazer conexões personalizadas conforme necessário. Isso me economiza muito tempo de configuração, evita erros de correção que custam ainda mais tempo e também protege meu equipamento e cabos do desgaste constante.
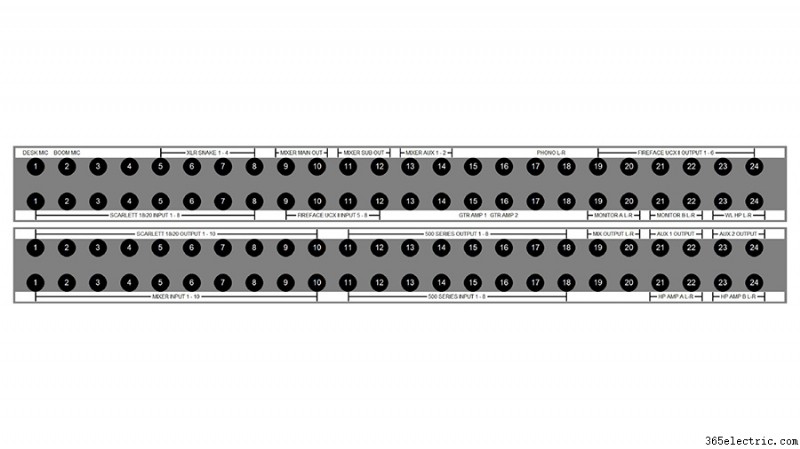
Na parte de trás deste patchbay TRS de ¼”, você encontrará 24 conectores de entrada na linha superior e 24 conectores de saída na parte inferior. Esses 48 conectores na parte traseira correspondem aos 48 conectores na frente do patchbay. Assim, você pode manter todo o seu equipamento conectado aos conectores na parte traseira e configurar fluxos de sinal personalizados conectando os conectores frontais com cabos de conexão.
Como configurar um patchbay
Ao configurar seu patchbay, é importante pensar no fluxo geral de sinal do seu estúdio. Dessa forma, você pode fazer o layout do seu patchbay para que as funções básicas do seu estúdio sejam configuradas por padrão, sem a necessidade de cabos de conexão. Isso é possível graças a um recurso embutido na maioria dos patchbays de áudio, chamado normalling.
Pense em cada par vertical de conectores em seu patchbay como um módulo. Existem três modos gerais e o modo que você escolher determinará como esse módulo funcionará.
Modo de passagem
O primeiro e mais básico modo é o modo 'Thru'. Isso significa que a tomada superior na parte traseira simplesmente fluirá para a tomada superior na frente e a tomada inferior na frente simplesmente fluirá para a linha inferior na parte traseira. Neste modo, as tomadas superior e inferior funcionam de forma independente.

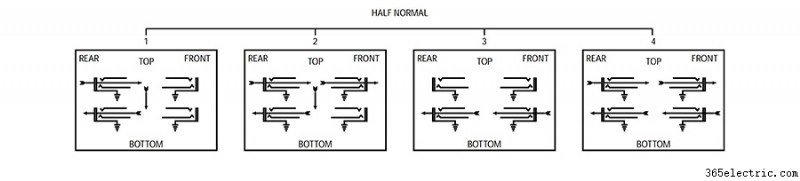
Semi-Normal
O segundo modo é chamado de meio normal. No modo meio normal, os conectores na parte traseira ainda correspondem aos conectores na frente (assim como no modo 'Thru'), mas o sinal do conector superior fluirá automaticamente para o conector inferior por padrão quando não houver nenhum cabo de conexão está conectado. No modo meio normalizado, essa conexão padrão é interrompida quando você conecta algo ao conector inferior no painel frontal. Em outras palavras, o conector de saída na parte superior flui para o conector de entrada na parte inferior, a menos que algo mais esteja conectado a esse conector de entrada.
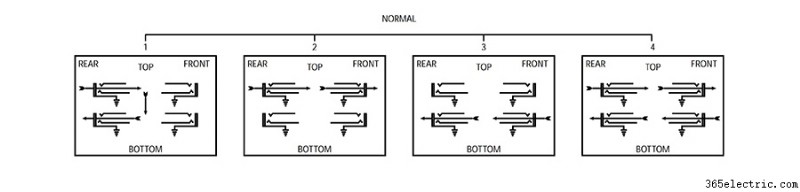
Normal
O terceiro modo é chamado de normal total. No modo totalmente normal, a conexão padrão de cima para baixo será interrompida quando um cabo for conectado à tomada superior ou inferior no painel frontal. Portanto, conectar um cabo de conexão à saída ou ao conector de entrada interromperá a conexão padrão.
Layout do Patchbay
Existem muitos usos para cada um desses modos e as possibilidades são infinitas, mas aqui estão alguns exemplos de como configurei meu patchbay para atender às necessidades dos vários dispositivos em meu estúdio.
The top left corner of my patchbay is where my microphones come in. Some of my microphones (like this boom mic) are directly wired into the top row of jacks on the back of my patchbay. Alternatively, I could have an XLR panel in the back of the room that connects to the top row of jacks on the back of the patchbay. That way, I could connect a microphone to that XLR panel which would then be available on the top row of my patchbay.
I will almost always want my microphones to connect to the microphone preamps on my audio interface, so I’ve set these jacks up in full-normal mode. This means the mics will be connected to my interface by default without any patching. But if I want to patch the microphone to a different mic preamp I can simply do so with a patch cable.
I chose to use full-normal instead of half-normal, because I don’t want to accidentally connect my microphone to two preamps that are both supplying phantom power. When I connect a patch cable to the top jack, it automatically breaks the connection to my interface. This also prevents me from connecting two microphones to the same audio interface preamp.
The other essential connections for my typical workflow are set up using half-normal mode. For example, my interface outputs flow directly to the input of my monitors. If I want to patch my turntable directly into my monitors for a pure analog connection, I can patch from my phono output jacks to the monitor input jacks and bypass the other components of the system. Given that this is set up in half-normal mode, the default connection from the interface outputs will be broken when I connect to the monitor input jacks.
Half-normal jacks also provide a way to split a signal. Let’s say I want to send my interface output to the input of my monitors while also sending that output to my wireless headphones. I just patch the output of my interface to the input of my wireless headphone transmitter and the signal still flows down to the speakers, because nothing is connected to the bottom jack. Remember – in half-normal mode, the connection is only broken when there is a plug in the bottom jack.
I use ‘Thru’ mode for my outboard effects and preamps because I don’t want the outputs of my compressor or outboard preamps to feed into their own inputs and create a feedback loop. Setting these modules to ‘Thru’ mode keeps the top jack and bottom jack independent from one another, meaning I need to manually patch these devices anytime I want to use them.
Which Patchbay Should You Use?
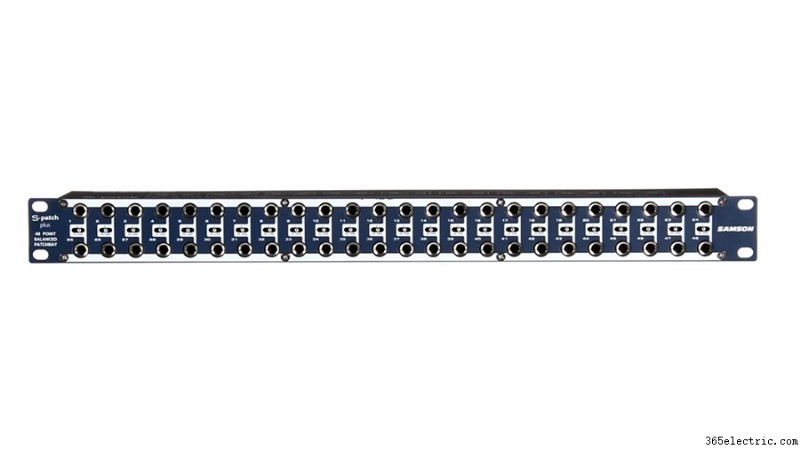
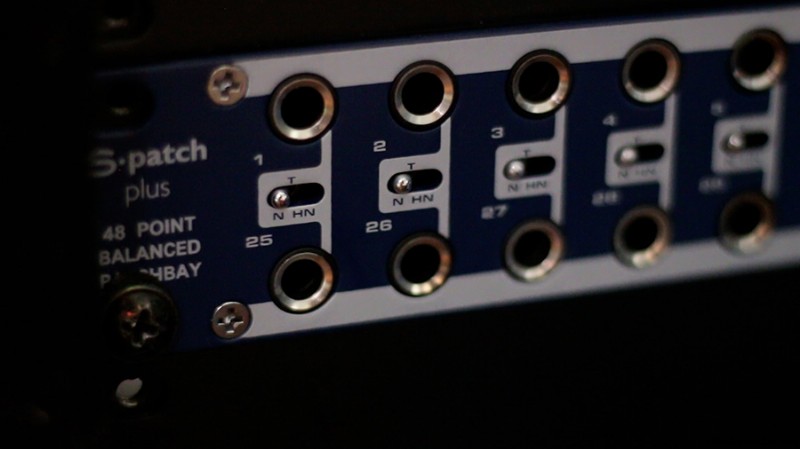
I have two 48-point ¼-inch TRS patchbays. One is a Neutrik, which costs about $100. The other is a Samson S-Patch Plus, which is a little more expensive. I’ve had some time to compare these two options and I think the Samson is well worth the extra money.
If I want to change the mode on any module in the Samson S-Patch Plus, I just need to toggle the switch between the top and bottom jack.
In order to switch the mode on one of the Neutrik modules, I need to disconnect the jacks from the front and back, remove the front panel of the entire patchbay, take the module out, flip it around, and reassemble everything.
This has caused me a few headaches as I have continued to add components and shift things around on the patchbays, so I would definitely recommend going with the Samson S-Patch Plus if you’re on the fence.
You should also consider how much space you have and how many connections you’ll need. These two 48-port patchbays take up 1RU of rack space each, which can really add up…
If you’ve got a larger collection of components or less rack space to work with, you may want to look into a TT (or tiny telephone connector) patchbay instead. These will be more space efficient, as the density of connection points is much greater with these smaller connectors.
You will also find patchbays that have multi-channel connectors in the rear rather than the same connection type on front and back. This can make for a cleaner setup, utilizing multi-channel fanouts rather than an individual cable on the rear panel for each connection.
